

You can do all the email marketing courses you want, pay copywriters or marketing agencies to develop gorgeous templates, but no amount of slaving over messaging and images or throwing-money is going to matter if your newsletter isn’t even being delivered.
Do This One Thing to Drastically Increase The Deliverability Of Your Mailchimp Sends
One of the main reasons that receiving email hosts like Gmail, Yahoo and Microsoft, reject emails is due to a lack of domain authentication.
Specifically, email hosts will look to see if your email domain has a valid DKIM and SPF record and if it doesn’t, then you’re campaign will be destined at best for spamland, at worst it will be rejected entirely and not delivered at all.
Authenticate your domain
Authenticating a domain provides info to the receiving email server that the email is being sent from where it says it’s being sent from. Note: and while I’m talking about Mailchimp in this blog, you should complete this or a similar process for any email marketing platform you’re using.
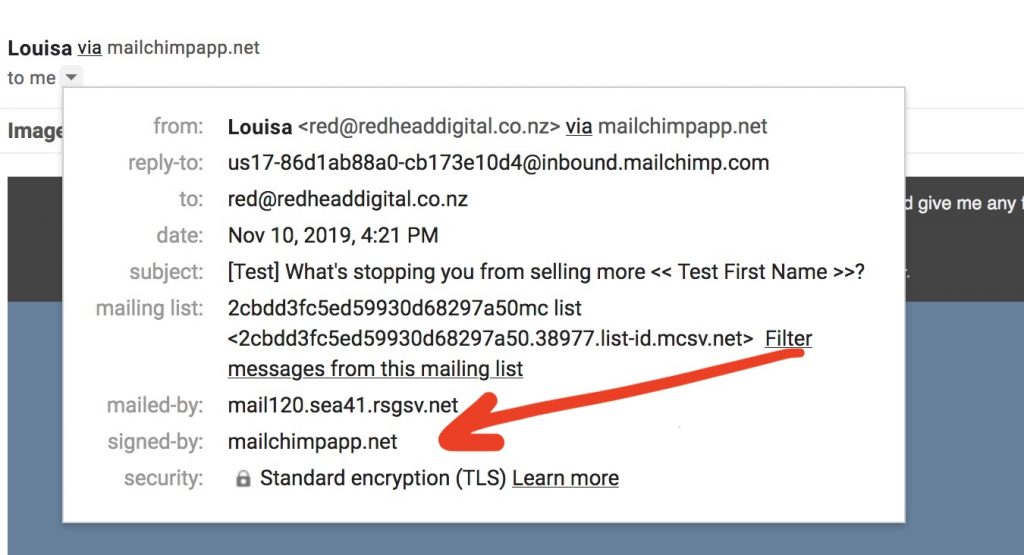
First thing you need to do is look in your inbox for one of your past campaigns sends. View the email header details. Does the signed-by field include your domain? If it’s showing Mailchimp’s (see the image above says it’s signed by mailchimpapp.net), then your domain isn’t authenticated and you need to follow these steps direct from Mailchimp’s help pages.
Custom authentication: task roadmap
To authenticate your domain, you’ll need to complete tasks in Mailchimp and in your domain provider’s zone editor or cPanel. This process requires you to copy and paste information from Mailchimp to your domain provider’s site. We recommend that you work with two browser windows or tabs to easily move between your sites.
Here’s a brief overview of the process.
| In Mailchimp | In Your Domain’s cPanel or Zone Editor |
|---|---|
| • Verify your domain. • Copy two important pieces of information, your CNAME record for DKIM, and your TXT record for SPF | • DKIM: Create a CNAME record for k1._domainkey.yoursite.com with this value: dkim.mcsv.net. • SPF: Create a TXT record for yoursite.com with this value: v=spf1 include:servers.mcsv.net ?all |
Note
- The values that you enter for these records are dependent on your hosting provider’s DNS console. Contact your hosting provider for specific setup-related questions.
- If your hosting provider requires you to use IP addresses, you can find Mailchimp’s IPs here.
Verify email domain and copy records
To get started, log in to Mailchimp to verify your email domain and copy your CNAME and TXT records.
Verify your email domain
Before you can authenticate your domain, verify your email domain on the Domains page in the Account Settings section of your Mailchimp account.

This process requires you to respond to a confirmation email. If you don’t receive the email after a few moments and you’ve checked your spam or junk folders, visit our verification troubleshooting guide.
Copy authentication information
After your email domain is verified, you’ll copy some important pieces of information in your Mailchimp account.
To find your domain’s authentication information, follow these steps.
- Navigate to the Domains page in your Account Settings.
- Next to the verified email domain you want to work with click Authenticate.
- In the Domain Authentication pop-up modal, we’ll show you what information needs to be added or changed with your domain provider.
- In another browser tab or window, use this information to edit your domain’s DNS record.
- Return to the Domains page in your Mailchimp account and click Authenticate Domain.
About DNS record changes
To authenticate your domain, navigate to your domain provider’s site. Then, use the DKIM and SPF information from Mailchimp to update your DNS records.
Domain providers use different names for the page where you’ll update the DNS record, like cPanel, Zone Editor, Zone File Settings, Manage Domains, Domain Manager, DNS Manager, or something similar.
Example CNAME Record for DKIM
Here’s an approximate example of what your CNAME record will need to look like to set up DKIM authentication. When you edit your own records, these columns and their labels may look different. Each DNS provider has different settings, so the setup illustrated in this article may not work for all domains.
| Record Type | Name | Value/Data | TTL |
|---|---|---|---|
| CNAME Record | k1._domainkey.yoursite.com | dkim.mcsv.net | Default |
DKIM Tips
- DKIM requires underscores in the CNAME file. However, in the past, DNS didn’t allow for underscores and some registrars still do not allow them to appear in the CNAME file. If you receive this type of error when you set up DKIM, the issue is on the registrar’s side. We recommend either of these three options: contact your registrar for assistance, set up a secondary custom domain with a registrar that allows underscores, or switch DNS providers.
- Depending on your provider, you may need to add a period at the end of your CNAME record. Some providers add this period automatically, so you may want to refer to their help site for more information.
Here’s an example.
dkim.mcsv.net.
Example TXT Record for SPF
Here’s an approximate example of what your TXT record will need to look like to set up SPF authentication. Remember, when you edit your own records, these columns and their labels may look different.
| Record Type | Name | Value/Data | TTL |
|---|---|---|---|
| TXT Record | yoursite.com | v=spf1 include:servers.mcsv.net ?all | Default |
SPF Tips
- SPF should be set up with a TXT record.
- When you make your updates, it’s important to also ensure that any other email service provider (ESP) or internet service provider (ISP) you use is also included in your SPF record.
- Avoid creating more than one TXT record for SPF. However, you can create multiple values in the same record with an include statement.
Here is an example SPF record.
v=spf1 include:spf.mandrillapp.com include:servers.mcsv.net ?all
- Depending on your provider, you may need to add quotation marks around your entire SPF record.
Here is another example SPF for use with Gsuite.
v=spf1 include:servers.mcsv.net include:_spf.google.com ~all
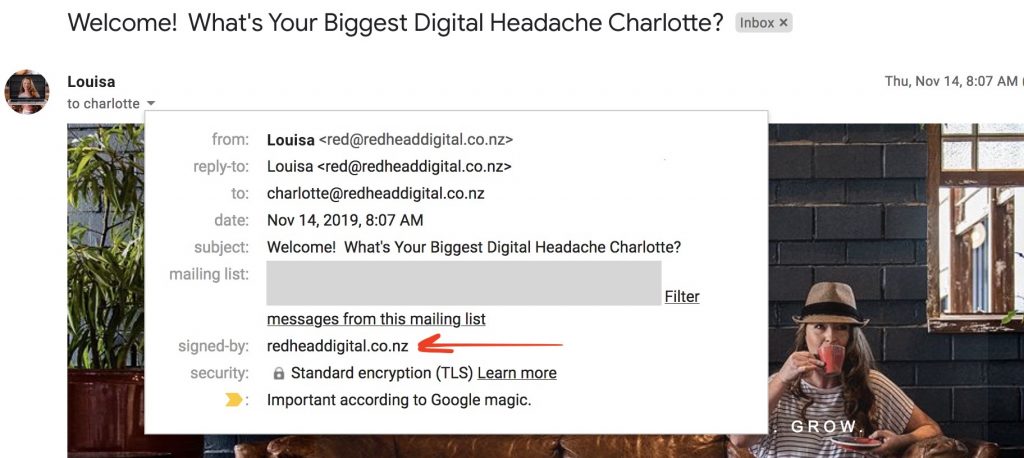
Once you’ve completed this process, your email will show as signed by your domain and will land in more of your audiences inboxes from now on. That’s it – you’re done!
Automatically Have Gmail Load Your Mailchimp Campaign Images
If you include images in your Mailchimp campaigns, an added bonus of completing the domain authentication is that Gmail will trust your emails enough to automatically load images (instead of asking your subscribers if they want to every time).


